Showing posts with label craft. Show all posts

Friday, March 23, 2012

Easter Egg Roundup

I'm staying in Easter mode today with this Easter egg roundup! If you missed the Spring/Easter Wreath roundup I did a few days ago, you can go here to check it out.  So... let's get to it!
(**Please click caption below image to go to source**)

Easter egg grass design from Better Homes and Gardens~

Better Homes and Gardens

Watercolor eggs from Alisa Burke~
Alisa Burke

Doodle eggs, again,  by Alisa Burke (both designs were so cute I couldn't choose one!)~ 
Alisa Burke

Decoupage eggs from Dizzy Maiden~ 
Dizzy Maiden

Leaf print eggs from Family Fun~ 
Family Fun

Rubber banded and dyed eggs from Real Simple~ 
Real Simple

Fabric Easter eggs from Retro Mama~ 
Retro-Mama

Sweet little eggs from Stylizimo...not sure if this is done with paint or marker - I'm sure either would work~
Stylizimo

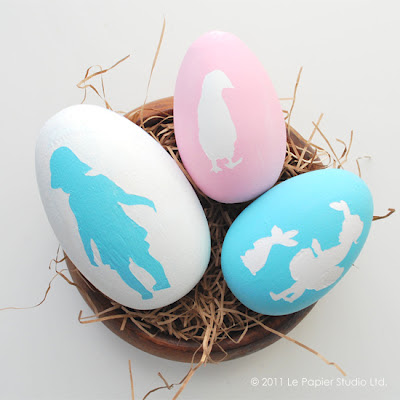
Silhouette stenciled Easter eggs from The Shopping Mama~ 
The Shopping Mama

Oh, and did I mention it's Friday? Can I get a Ya-to-the-Hoo?!?!?!? YAHOOOOOOO!!!! Have a great weekend!

Tootles,
Sarah

Monday, March 19, 2012

Spring/Easter Wreath Roundup

Hi all! Well, now that St. Patrick's Day is behind us it's time to start thinking Easter/Spring! I've rounded up some wreaths that caught my eye while I was looking for inspiration. Take a look ~
(**Edited**click caption below image to go to source...)

 According to Laura at Top This Top That, this is the easiest burlap wreath you'll ever make~

Top This Top That

An elegant tea stained coffee filter wreath from Design Dining and Diapers~

Design Dining and Diapers

Check out this recycled spring wreath from Cheap Crafty Mama.  See the flowers?  Those are recycled cans!


This wreath from Corner House just screams spring with its fresh colors~

Corner House

A fun, non-traditional rectangular shaped wreath from Delightfully Noted~

Delightfully Noted

I love, LOVE this chocolate bunny wreath from The Baker's Daughter~

The Baker's Daughter

Nothing says spring like moss, eggs, and burlap. A sweet simple wreath from Butterfly Above~

Butterfly Above

Such a fresh look with the eggs and grass from A Diamond in the Stuff~

A Diamond in the Stuff

Love the fuzzy little chicks used to make this wreath from Design Editor~

Design Editor

A sweet bunny wreath from Everblooming Original~

Everblooming Originals

Could this wreath from Fake-it Frugal be any cuter? I think not! It's inspired by Mr. McGregor's vegetable garden from the story 'Peter Rabbit.' The veggies are made from coffee filters~ 

Fake it Frugal

I love the message on this 'Hybrid' wreath from Rhonna Designs~ 

Rhonna Designs

I am constantly amazed by all the creativity and talent that can be found here in bloggy land and on Etsy!  Which one is your favorite?

Tootles,
Sarah

Monday, March 12, 2012

Lucky Horseshoe

Wow!  I took a bit of an unintentional break there!  Norah was sick for a good week followed by Isaac being sick for almost the entire week after that which didn't leave me a whole lot of time to focus on much of anything else.  But Norah is back to her feisty self and Isaac is getting close to his old happy self again, thankfully!

So anyway I'm back to share a fun St. Patrick's Day decoration I made for my front door.  I was trying to think of something I could make other than the usual wreath and a little light bulb went on in my head....a lucky horseshoe!  Once I figured out how to go about making the actual horseshoe shape it all came together quite easily.  Ta-dah......


Here is how I made it:
Start with a foam wreath form ~


Using a steak knife, cut off the top 1/4 of the wreath ~


Use the piece you cut off for the top portion of the shoe...cut to size ~


I bought some wood letters to spell 'lucky' from Hobby Lobby ~


I gave the horseshoe a coat of gold paint and the word a coat of green just in case the glitter didn't give me full coverage ~


I attached the little bits at the top of the horseshoe with toothpicks and glue ~


Then, just go to town with some Mod Podge and glitter ~


After I covered the horseshoe and letters with glitter I gave them both a coat of clear acrylic to help keep the glitter in place ~


Then just hot glue your letters to some ribbon and attach to your form.  I made some felt flower rosettes to add some color.  You can see how I make them here.  Finally, just attach some ribbon to the back of the horseshoe, hang, and enjoy!


I'm hoping to have a somewhat productive week, so hopefully I'll have more to share soon! If you haven't already, I would love it if you'd follow Picked by Jane either via email, Google Friend Connect, Linky Followers, or subscribe using the RSS feed in your bookmarks tab, these options can be found in the sidebar.  Feel free to follow me on Pinterest as well - that button is toward the top of the sidebar.
 Happy Monday!

Tootles,
Sarah 

*I'm linking up at some of these great blogs...

Sunday, February 5, 2012

Love is in the Air


Valentine's Day isn't a holiday that I usually go all out decorating for. Most years I put something on the front door a few days before the 14th and that's about it. This year I've been having fun putting little decorative touches here and there around the house. I spent some time this weekend working on this little vignette ~


This is what this cabinet looks like most of the time~


I rounded up some things I had around the house and came up with this cute little display~


The branch with tissue paper buds was something I made for my sister's baby shower this past summer. Of course, I couldn't bring myself to throw it away afterward, so it's been hanging out in my daughter's room.
I embellished an old mason jar and photo holder with paper doilies and yarn~


 I added some romantic vintage postcards that I've had for years~


I propped up a weathered board to cover the art on the wall and added....you guessed it...a paper doily, yarn and postcards~


I pulled out an old antique frame to display this yarn ball garland that I made a la Courtney at A Little Glass Box~
 

I made a second garland to hang from the front of the cabinet.  These by far are my favorite part of my little vignette!  Courtney has an Etsy shop where she sells her cute yarn ball garlands, you should definitely check it out!


 Have a great week!
Tootles,

I'm linking up! Tatertots & Jello 

Thursday, January 26, 2012

Coffee Filter Valentine's Wreath

So, I've had a package of coffee filters laying around for quite awhile now. When I say awhile, I mean ever since we got our Keurig over a year ago...ahem...It would be a shame to waste them, right? ANYway I decided to make a wreath to gussy up my antlers for Valentine's Day.
Here's how it turned out ~

It's a bit shabby and rustic, but still has some sparkle and I just love it.   And the best part is, I didn't spend a penny!   Here's how I did it ~

I cut a wreath shape out of an old cardboard box for the base. (Doesn't need to be perfect)


Gather the filter like so, and secure with a staple or glue ~


I used good ol' Elmer's glue and added just a little water to it.  Dip just the edges of the filters in the glue and then into the glitter ~


Be sure not to use too much glue, or you'll end up with floppy filters like this ~


Then just start hot gluing your little clusters to the form~


Work your way around the wreath filling in and fluffing as you go, until you end up with something like this ~


As you can see I topped it off with a sweet little "Love" banner.  I used some burlap ribbon, cut out some letters and glitter-fied them, and attached it to some twine.  Super simple!


Have a LOVEly day!
Tootles,
  I'm linking up!  The 36th Avenue
 
Site Design By Designer Blogs